How To Perform Selective Coloring In Photoshop 2021
There are many ways to do selective colors in all photo editing programs. Today, I’m going to show you one way to do it in Photoshop 2021.
Photoshop 2021 has a 7 day free trial and can be purchased for $9.99 per month after the trial period. Click Here.
Selective coloring is a popular post-processing technique where most of a photo is converted to black and white, but some parts are left in color.
In this tutorial, you’ll learn the techniques on how to apply color on selected part(s) of the image using layers and masks in Photoshop 2021.
Step 1 Setting up the file
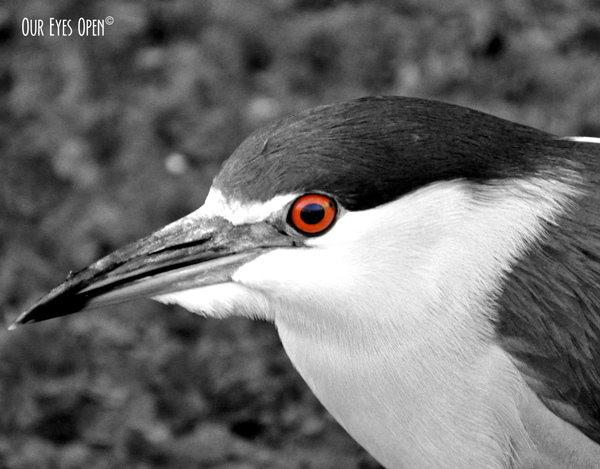
Open an image file of your choice in Photoshop by going to File > Open (Ctrl+O). In this tutorial were going to use Black_Crowned_Night_Heron_SC.psd. It was originally a .jpg from my SD Card. I placed my logo by copying it from the logo file and pasting it into my working image. Resized and moved logo to desired area.

Step 2 Duplicate the background layer
Create a copy of the background layer by Right clicking on it then choose Duplicate.

Click the duplicated layer, click OK. Once you click OK, you can see the new layer.

Change the name to BNW by double clicking on the new layer. This will become the black and white part of the image.

Step 3 Black and White
Turn the BNW layer into a black and white effect. Click the new BNW layer if you do not have it selected. Choose Image > Adjustments > Hue/Saturation. Slide the Saturation all the way to the left and click OK.

Step 4 Masking
Next step is to create a mask. Masks are used to hide part(s) of the image or the whole image. Masking is a very useful tool in image editing as it allows you to edit part of the image without having to worry that you will lose information.
To create a mask, go to Layers > Create Clipping Mask. Your layer palette should now have the following:

Use the Eraser tool, brush over the area you want to bring the color back.
NOTE: To increase or decrease the size of your brush, hold the windows key and select bracket keys [ ]. One will make it be smaller and one will make it be larger. You can click Z to scroll with your mouse to zoom in on the area you are working on. To zoom back out, click and hold the Alt key while scrolling.


Step 5 Merging and Saving
Merging the layers is an optional step. I like to keep my layers intact. Once you merge them, save them and close your file, you can never have them in layers again unless you start over.
To merge the layers, shift click on any layer you want to merge. Right click anywhere on the layers > Merge Layers. Now go to File > Save As Choose JPG then give it your desired file name. Save. If you wish to further edit the image in the future, do not merge the layers and save it as a .psd file.
FINISHED PRODUCT
Before

After

19 responses to “Selective Color Tricks #2 – Photoshop 2021”
Nice tutorial 😀
LikeLiked by 1 person
Thank you Cee! It was fun doing them. I actually use a different technique but I was to do an easy version. 🙂
LikeLike
The results are fun, and your tutorial’s excellent, but ….I haven’t got a technical bone in my body ….
LikeLiked by 1 person
Well, you need to have some kind of software to make this happen. There will always be next week. I’m sure you can conjure up photos with at least 2 species in the frame. I know I’ve seen some already. 🙂
LikeLike
We’ll see. Tbh I’m catching up with having been away, and going away again!
LikeLiked by 1 person
I hope you have fun wherever it is you are going again. I wish we were going somewhere but that is just not an option right now. I got cyber attacked on Friday and today is my first day back on the blog. 🙂
LikeLiked by 1 person
Oh no! What pleasure do these people get from making life difficult?
LikeLiked by 1 person
They want to steal your identity and your money. Pretty simple! They got nothing from me except giving me a headache. 🙂
LikeLiked by 1 person
Let’s hope they get the headache too. And more.
LikeLiked by 1 person
LOL! Yeah they are sneaking little thieves. 🙂
LikeLiked by 1 person
I cheat a little Lisa. I use the selective focus script which sometimes doesn’t give me what I would like 🙂
LikeLiked by 1 person
I cheat too. I do it a completely different way but it is more detailed and I didn’t want to offer up intermediate at this time. I also didn’t get into the selection tools to much either. I might have to start doing tutorials if there is an interest. 🙂
LikeLiked by 1 person
Damn….I meant selective colour script not focus 😦
LikeLiked by 1 person
I knew what you meant! LOL! You always make my day a little better. 🙂
LikeLiked by 1 person
😀
LikeLiked by 1 person
[…] Adobe Photoshop […]
LikeLiked by 1 person
[…] to do this in the past, but they can be a bit of a blunt tool. So I was happy to find that Lisa’s detailed instructions for creating this effect in Photoshop also worked for my own Photoshop Elements software. Thanks […]
LikeLiked by 1 person
Very easy & helpful tips. Thanks for sharing Photoshop Color Tricks. It was really helpful to me
LikeLiked by 1 person
Glad you liked it and found it useful. 🙂
LikeLike